Procedure to standardize the Kile Gauge used for aerosol can crimp depth measurements.
1. Standardize the Depth Gauge before using in the following manner. This is required at reasonable intervals as determined by the degree of accuracy that is needed.
2. Take the Hexagonal Standard Gauge Block as shown. Make sure the Standard Block has an identification number stenciled on the side of the block in the machined-out recess. (If not, contact the gauge supplier).
3. Turn the Standard Gauge Block so the side marked "Depth" is face up (note the dimension for the depth in the machined-out recess).
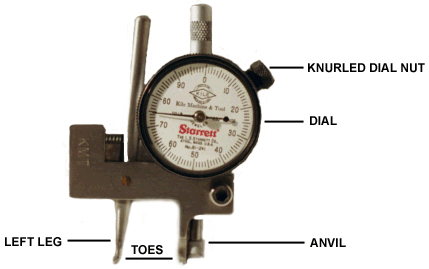
4. Place the Depth Gauge in the right hand with the dial to the right. Place the Standard Gauge Block in the left hand.
5. Insert the left leg of the Depth Gauge into the Standard Gauge Block groove, lightly pushing the Depth Gauge to the left until the right toe engages in the recessed area of the Standard Gauge Block. The anvil of the dial indicator will then rest on the top of the Standard Gauge Block.
6. After engaging the Depth Gauge into the Standard Gauge Block, slowly rotate the Depth Gauge and Standard Gauge Block until they work smoothly together. Slowly rock the Depth Gauge forward and backward to change it perpendicular position in relation to the Standard Gauge Block. This will permit the anvil on the dial indicator to reflect the shortest distance between the anvil and the toe of the Standard Depth Gauge. The depth measurement is being taken at the anvil and the right toe. The dial should read when in the perpendicular position to the Standard Gauge Block, the last two numbers stamped on the Standard Gauge Block. If the dial does not read the last two numbers stamped into the Standard Gauge Block, loosen knurled nut at the side of the face of the dial and move the dial face so needle lines up with the proper reading. Re-lock the knurled nut. To get the true reading, add 0.1" to the dial reading. (See note below)
Once the Depth Gauge has been properly stadardized, can crimp depths may then be determined.
1. Before using the Depth Gauge, mark the valve cup at the center of each crimping segment indentation of the crimping collet.
2. Hold the Depth Gauge in the right hand with the dial face up. Hold the can to be checked in the left hand.
3. Insert the left leg of the Depth Gauge into the crimped valve cup, moving the Depth Gauge to the left until the right toe of the Depth Gauge engages the valve cup crimped area with the anvile of the tial indicator resting on the top of the valve cup.
4. With the can to be checked in the left hand, Depth Gauge in the right hand, slowly counter rotate the can and Depth Gauge until a smooth feel is developed near the center of one crimping collet segment indentations. Do not lift the can with the Depth Gauge.
5. Slowly rock the Depth Gauge forward and backward to change its perpendicular position in relation to the can. This will permit the anvil on the dial indicator to reflect the shortest distance between the anvil and the toe of the Depth Gauge. The depth measurement is being taken at the anvil and the right toe. This reading (the lowest number) will require the addition of 0.1" to give the true reading of the gauge. (Example: if a dial reading is 85, then true depth reading is 0.185").
6. Rotate the can and Depth Gauge to a new collet segment indentation and determine the dial reading as in #5 above. Correct the dial reading to the true reading as in #5 above. Do this operation until you have read the depth of each crimping collet segment indentation.
The user assumes all risk of use or handling, including all risk of consequential or incidental damages, whether or not use or handling is in accordance with directions.
Note: Some Standard Gauge Blocks are stamped to the nearest five ten thousandths of an inch. For these use the last three numbers.
© 2024 Kile Machine & Tool, Inc.
Built on Envisionwise Technology.